Resources · Guide 18 · MASK
Fix one part of a picture and leave the rest alone: the inpainting method, plus where it lives in each tool
Inpainting regenerates only the part of a picture you paint over, the mask. In diffusion tools the model adds noise inside the mask and redraws that area while it can still see the pixels around it, which is why the new part picks up the light and the colours. Most of the craft is in three choices: how big you paint the mask, how soft its edge is, and a prompt that describes what should be there rather than what is wrong.
How it works
You paint a mask. The model adds noise only inside it and redraws that area, while it can still see everything around it.
Soften the edge (mask blur or feather) and paint a little past the problem: the new part fades into its surroundings instead of leaving a seam.
What you'll make
- A six-step inpainting method that works in any tool
- How to size and soften a mask so the fix blends in
- How to write the fill prompt, with six copy-paste prompts for common fixes
- A compact per-tool reference: Photoshop, Firefly, Midjourney, ChatGPT, Gemini, Magnific (formerly Freepik), Krea, Ideogram, the FLUX.1 Fill API, Automatic1111 / Forge and ComfyUI, with the settings that matter
- Fixes for seams, colour shifts and objects that keep coming back
What you need
Photoshop or Adobe Firefly
Generative Fill: select or brush the area, type what goes there, or leave it blank to remove
Midjourney
The Editor on midjourney.com: Erase brush or Smart Select, then edit the prompt
ChatGPT Images
Open the image, use Select to highlight the area, describe the change
Magnific, Krea or Ideogram
Retouch, Change Region or Select area: brush a mask and describe the change
Automatic1111, Forge or ComfyUI
Full control over mask blur, padding and strength on your own computer
Claude
Plans the passes, writes the fill prompts and checks the result (see the skill)
Step by step
6 steps-
Check it is an inpainting job
Inpainting is for pictures that are right except for one part: a hand, a sign, a stray person, a label, the sky. If the composition or the style is wrong, regenerate or restyle the whole image instead. Inpainting a picture that is mostly wrong takes longer than starting again.
List the fixes and do them one at a time, biggest first. One mask, one change, per pass. Fixing a hand and a sign in one mask gives the model two jobs and a muddled prompt.
-
Paint the mask a little bigger than the problem
Cover the whole problem plus a margin of clean pixels around it, so the model has room to join old and new. For a hand, include the wrist. For an object you are removing, include its shadow and reflection, or they stay behind as ghosts.
Don't cover a face or a product you want to keep. Everything inside the mask can change.
-
Soften the edge
A hard mask edge leaves a visible seam where new pixels meet old. A soft edge blends them. Firefly's brush has a Brush hardness slider: lower it. Automatic1111 and Forge have Mask blur (default 4, up to 64). ComfyUI's VAE Encode (for Inpainting) grows the mask with grow_mask_by (default 6, up to 64).
Tools without an edge setting (Midjourney, ChatGPT, Magnific, Krea, Ideogram) still blend better when the mask runs a few pixels into clean background instead of hugging the object's outline.
-
Describe what should be there, not what is wrong
The model reads your prompt as a description of the masked area. "Fix the hand" tells it nothing about what a good hand looks like. "A relaxed left hand resting on the table, five fingers, soft window light from the left" does. Mention the light and the material so the new part matches the old.
To remove something, describe the background that should show through ("empty wooden floor"), or in Photoshop and Magnific's eraser leave the prompt blank and the tool fills from the surroundings.
Ask ClaudeHere is my image and what's wrong with it: [DESCRIBE]. Plan the inpainting passes in order, one change per pass. For each pass tell me exactly what to cover with the mask (including any shadow, reflection or wrist), and write the fill prompt describing what should be in that area: the object, its pose, the material and the light direction you can see in the rest of the picture. I'm using [TOOL].
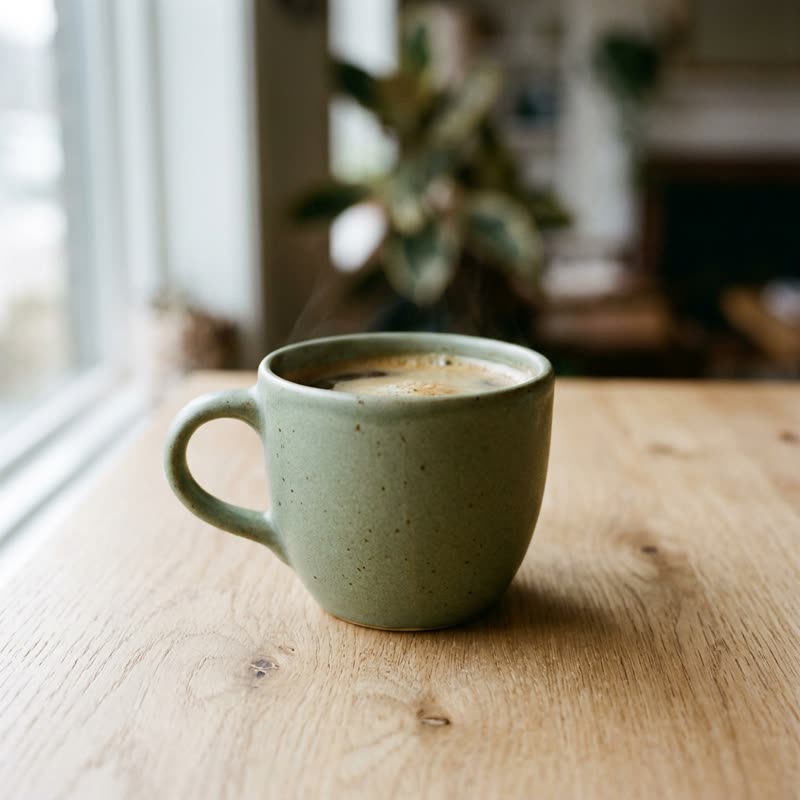 Before
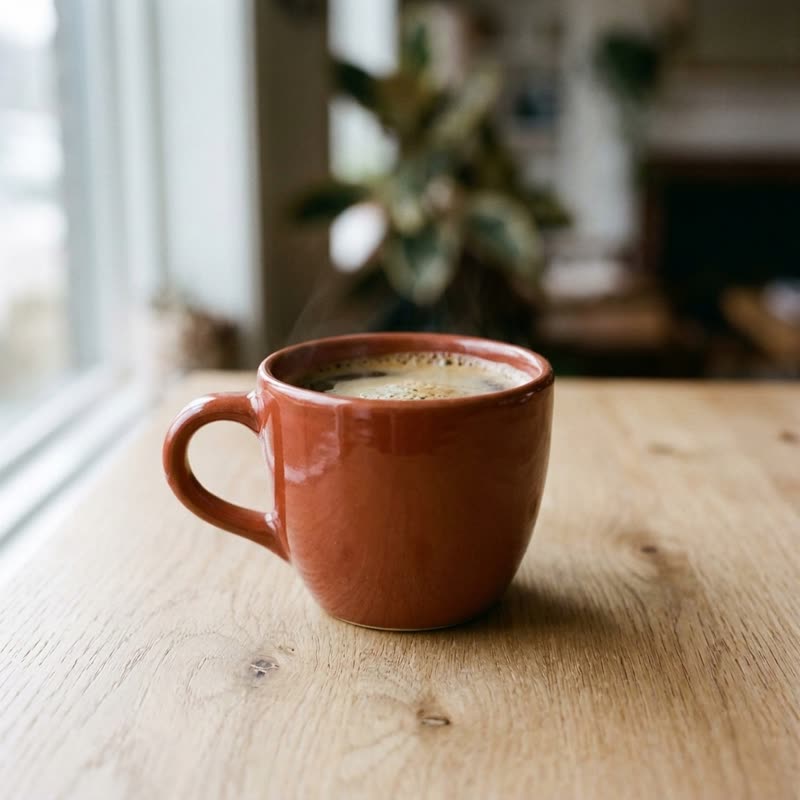 After
Nano Banana 2.1 has no mask: you describe the change and what must stay. Prompt: “Change only the cup: make it glossy terracotta red with a subtle shine. Keep everything else exactly the same.” The table, window and light held; small details can still shift, so check at 100%. Made for this guide on 31 October 2026. -
Set the strength, where the tool lets you
In Automatic1111 and Forge, Denoising strength (default 0.75) sets how far the new pixels may move from the old. As a starting point we use about 0.4 to 0.6 with Masked content set to original for a small correction, and 0.8 to 1 with fill or latent noise to replace an object outright. Inpaint area "Only masked" (padding default 32 px) redraws the masked part at full resolution, which helps small details such as faces in a wide shot.
In ComfyUI, keep denoise high with VAE Encode (for Inpainting): the docs warn that a low value leaves grey blocks. For gentle fixes, encode normally and use Set Latent Noise Mask or InpaintModelConditioning instead. On the FLUX.1 Fill API, steps run 15 to 50 (default 50) and guidance 1.5 to 100 (default 60).
Photoshop, Firefly, Midjourney, ChatGPT and the other app tools don't expose a strength setting. Control them with the mask and the prompt.
-
Generate several and check at 100%
Ask for three or four variations and zoom to 100% before choosing. Check the edge for a seam, the light direction, the colour temperature, the grain or noise, and the contact shadow where the new part touches something.
If one is almost right, don't regenerate the whole area. Mask just the remaining fault, smaller, and run another pass. Upscale only after the fixes are done.
Ask ClaudeHere are the original and my inpainted version. Compare them closely: is there a visible seam at the mask edge, a change in light direction, colour temperature, sharpness or grain, a missing contact shadow, or anything that changed outside the area I meant to edit? List each problem with where it is, and tell me the smallest mask and prompt that would fix it.
Put it to work
-
Where inpainting lives in each tool (as of October 2026)
Photoshop (desktop): make a selection, for example with the Selection Brush, select Generative Fill, pick a model in the Contextual Task Bar (Firefly Fill & Expand, Firefly Image 5 or 1, or partner models FLUX.2 pro, FLUX Kontext pro, Gemini 3.1 with Nano Banana 2, Gemini 3 with Nano Banana Pro), type a prompt or leave it blank to fill from the surroundings, then choose a variation in the Properties panel.
Adobe Firefly (web): Image > Edit image, then Fill in the left toolbar. Brush over the area (Select more / Select less), set Brush size and Brush hardness, optionally add a reference image, type the prompt and select Fill. Removal has its own Generative remove tool. Hover the indicator by the Fill button to see the credit cost.
Midjourney: in the Editor on midjourney.com (the Edit tab for your own uploads), use the Erase brush (Restore brings areas back) or Smart Select with include and exclude points, then Erase Selection. Edit the prompt and submit. Inpainting uses the V8.X Edit Model; V8.X edits appear on your Create page and publicly unless you use Stealth mode.
ChatGPT Images: open the image, choose Select, highlight the area (a slider sets the size), then describe the change. OpenAI warns that highlights are not always precise and edits may extend beyond the selection, so check the rest of the picture.
Gemini (Nano Banana): Google's help documents no mask tool. Edits are made by description ("Local edits"), so name the area precisely: "the mug on the left, only the mug". Editing images requires being 18 or over.
Magnific (formerly Freepik, renamed in April 2026): Image Editor > Retouch. Mask with Lasso, Click or Brush, describe the change, Generate. Include Image puts a reference photo into the mask; Character mode uses your Custom Characters. To remove something, use Edit's eraser: mask and Generate with no prompt.
Krea: Krea Edit > Change Region. Select the whole image, paint with the brush (adjustable size), draw a rectangle, or hover for Auto Mask, then prompt and Generate. Earlier results stay as thumbnails to compare or revert.
Ideogram: Studio (it replaced Canvas and Magic Fill). Select the image layer, then Tools > Select area (paid plans), set Brush size (10 to 80), paint, describe the change and select Generate. Only the painted area changes.
FLUX.1 Fill [pro] (Black Forest Labs API, /v1/flux-pro-1.0-fill): send the image and a black-and-white mask of the same size, white is redrawn and black is kept, or one PNG or WebP where transparent areas are redrawn. steps 15 to 50 (default 50), guidance 1.5 to 100 (default 60), seed optional.
Automatic1111 and Forge: img2img > Inpaint. Mask blur 4 (0 to 64), Mask mode Inpaint masked, Masked content original (or fill, latent noise, latent nothing), Inpaint area Whole picture or Only masked, Only masked padding 32 px (0 to 256), Denoising strength 0.75. Soft inpainting has been built in since version 1.8.0. Upload mask expects white where you want inpainting.
ComfyUI: right-click Load Image > Open in MaskEditor, paint, Save. Feed the mask to VAE Encode (for Inpainting) (grow_mask_by default 6) with denoise kept high, or for subtle fixes to Set Latent Noise Mask or InpaintModelConditioning (noise_mask on by default). The official tutorial uses a dedicated inpainting checkpoint for cleaner transitions.
-
When it goes wrong
Visible seam or halo: the edge is too hard or too tight. Soften it (blur, hardness, grow) and repaint a thin mask across the seam only.
New part is too bright, too sharp or the wrong colour: describe the light and the camera in the prompt ("dim tungsten light, slight film grain"). In Automatic1111 and Forge, Only masked can over-sharpen a small area; try Whole picture.
The object comes back: the prompt still mentions it, or the shadow is outside the mask. Describe only the background, and include the shadow.
Hands or faces still melt: mask bigger (wrist, neck), describe the pose plainly, and generate more variations. Small faces in wide shots redraw better with Only masked, at full resolution.
Nothing changes: in Automatic1111 and Forge, denoising is too low or Masked content is original on a big change. Raise it or switch to fill or latent noise.
Copy-paste prompts
a relaxed left hand resting on the wooden table, five fingers, natural nails, soft window light from the left, same skin tone as the arm, shallow depth of field
empty cobblestone street continuing into the distance, wet stones reflecting the evening shop lights, no people
a plain matte cream paper label wrapped around the glass jar, following its curve, no text, lit softly from the right like the rest of the jar
clear late-afternoon sky, pale blue fading to warm peach near the horizon, a few thin high clouds, sun low on the right matching the shadows on the buildings
a woman's face in three-quarter view looking toward the sea, calm expression, light freckles, hair blowing to the right, soft overcast daylight, 35mm film grain
a small white ceramic coffee cup on a saucer, half full, steam rising, sitting on the marble counter with a soft contact shadow, morning light from the window behind
Tips
- One fix per pass. Two problems in one mask means two jobs in one prompt.
- Include shadows and reflections in the mask when you remove something, or they stay behind.
- Write the prompt as if you were describing only the masked area to someone who can see the rest of the photo.
- Fix before you upscale. Inpainting on a 4x upscale is slower and the new part can look softer than its surroundings.
- Keep the original. Save each pass as a new file so you can go back a step.
- Don't use inpainting to change a real person's face or body without their consent, or to alter documents and product claims.
Claude skill
Do it in one go with the inpainting skill
Give Claude your image and what's wrong, and it plans the inpainting passes, tells you exactly what to mask, writes the fill prompt and the settings for your tool, and checks your result for seams and colour shifts. Includes a per-tool reference for eleven tools and a script that makes feathered black-and-white masks for the FLUX.1 Fill API, Automatic1111 or ComfyUI.
Download inpainting.zipIn Claude (web or desktop app)
- Open Settings → Capabilities and make sure code execution is on.
- Under Skills, choose Upload skill and pick the zip.
- Start a chat and describe what you are making. Claude uses the skill on its own when it fits.
In Claude Code
- Unzip it into
~/.claude/skills/(or.claude/skills/in a project). - Restart Claude Code and ask for the result. The skill loads when it fits.